
Setting up the H.264
:
from
to
Setting up the H.264 DVRs
H.264 DVR
Back to H.264 Support | Support Home
In this KB, we will go through the process of setting up our new standalone H.264 DVR for (1) Initial Setup, (2) Recording, (3) Playback / Search setup (4) Remote View / Remote Playback (5) Backup to Local PC and USB Flash drive. This guide uses the DVR8024 to demonstrate but the same steps will apply to the 8 and 16 channels as well.
Prerequisites: All the cameras must be plugged in for this exercise. If we have a USB mouse, then let�s make sure that is plugged in, otherwise, we may have to use the front panel buttons to control the operation.
1. Initial Setup
After we have inserted a 3.5� SATA Hard Disk Drive, 4 cameras, and 1 VGA monitor, we should see something like the following.
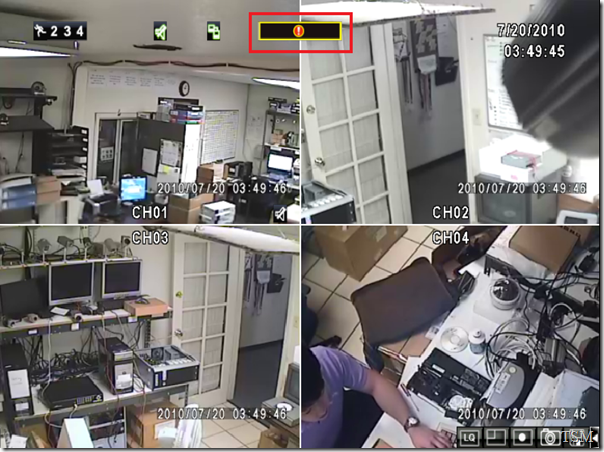
Notice the black bar in yellow outline at the top. This could mean that we do not have a hard disk drive plugged in or that our plugged in hard drive has not been initialized.
Since I know I just put in a new 1 TB HDD, I�m going to go to the initialize menu and make sure the hard drive is properly formatted in the DVR�s native format. Go to Setup (the gear icon) > Main Menu (the page icon).
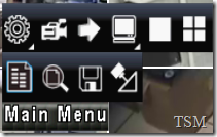
We should be brought to the main landing screen. The following screen is an important gateway between this and the next couple of sections in this KB article.
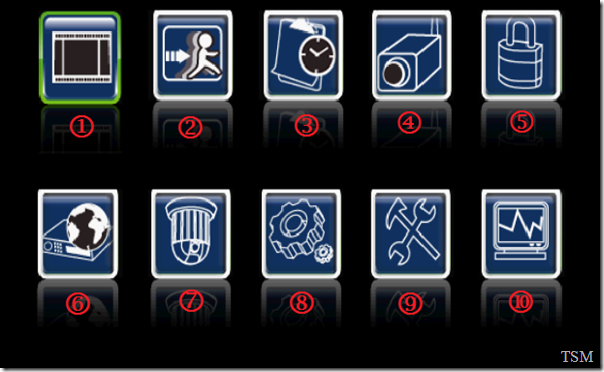
Figure 1. The main landing screen
The icon we want to go to is this icon, it�s Utility icon, labeled #9. Inside the Utility menu, we want to choose �HDD Initialization��
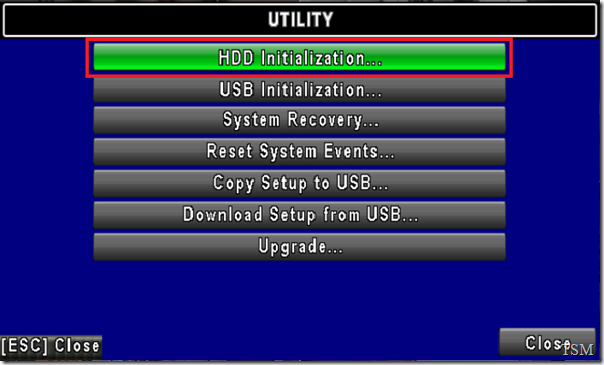
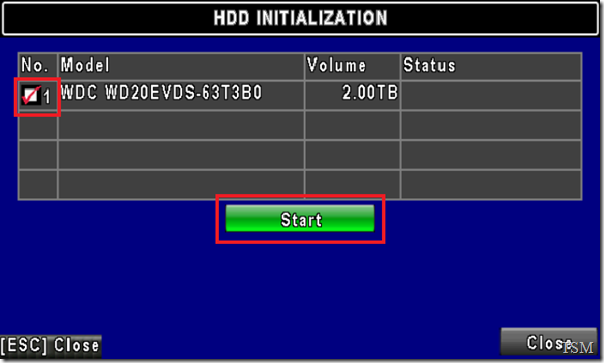
In the following screen, be sure to the blank box next to (1) and click on Start to begin the HDD Initialization.
Choose �Yes� in the corresponding pop-up menu�. Note: This WILL remove all the data on the hard drive, including any previously recorded videos that may exist!

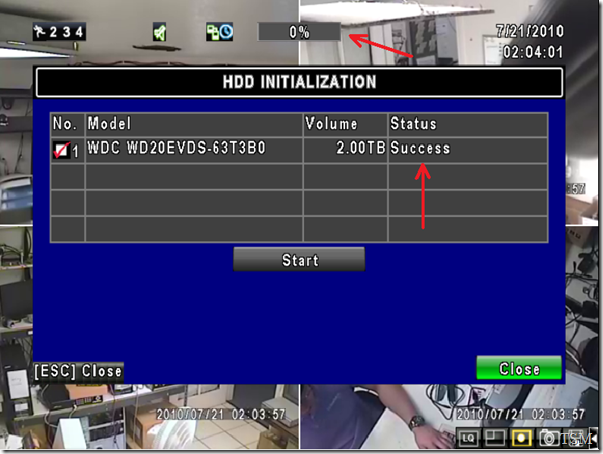
Once the HDD finishes initializing (should only take a few moments). we should notice a few changes, as outlined by the red arrows below. Close out of the menu by pressing on �Close� at the bottom right.
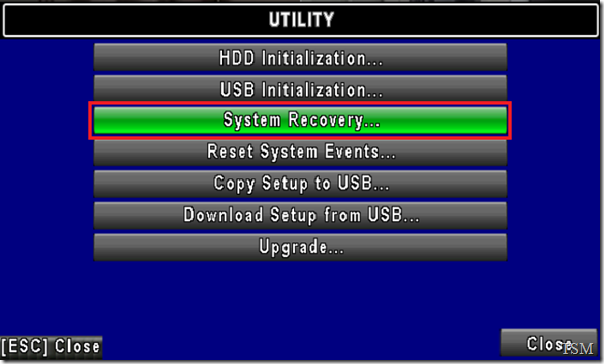
Now, after clicking on �Close� above, we should be back at the Utility screen. This time, choose �System Recovery.�
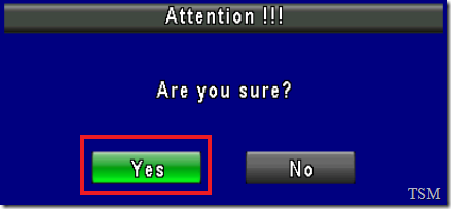
Choose �Yes� in the corresponding popup menu. Note: This WILL restore all the settings for this system back to factory defaults. i.e. the recording settings, network etc will be reset!
After we have chosen Yes, just click out of the menu and Unplug the power to the DVR. Plug in the power after 15 seconds and our device should be restored back to factory defaults. Continue to the next section for setting up the DVR for recording.
2. Recording
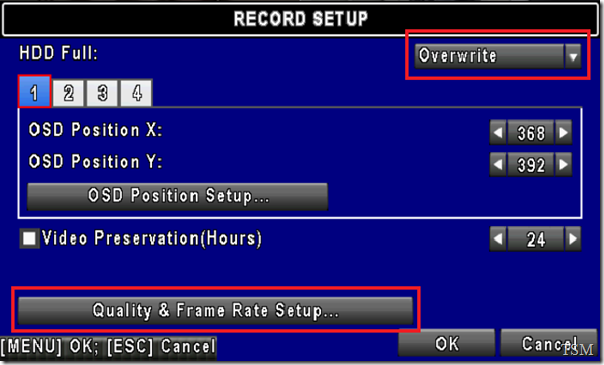
Once section 1 is complete, we will need to set up our DVR for either Motion detect or Around-the-Clock recording. Navigate back to the main menu and choose the Record Setup icon, labeled #1 in Figure 1 above.
In the Record Setup menu, double check to make sure when the HDD is full, it is set to automatically �Overwrite�. Afterwards, head over to the �Quality & Frame Rate Setup��
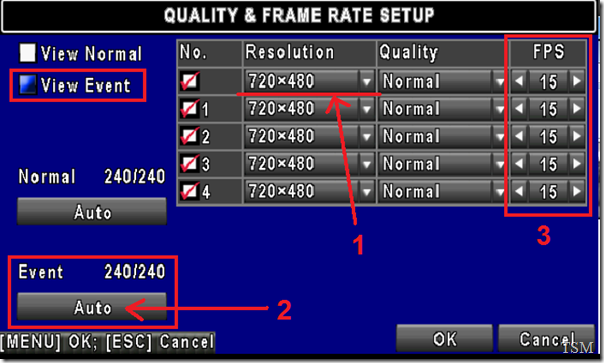
In the Quality & Frame Rate Setup page, the default filter is set for �View Event.� In this view, we can customize the specific frame rate (FPS) response to an event (such as motion) for every single camera. If we select the �View Normal� filter, we can also select and choose the appropriate FPS response for each camera even if there is no motion (i.e. around-the-clock).
However, for this guide, we will focus on the easiest way to get the most optimized setting. In the figure below, either select �View Event� or �View Normal�, depending on whether we want to do motion detect recording or do around-the-clock recording. Doesn�t matter which one we pick, but I�m choosing the Event recording. Now, we should select a resolution we want to record at, choose a FPS and make sure that it doesn�t exceed the maximum amount allotted by the system. By default, for this 4-channel, it is set to 720�480 resolution at 15FPS.
We want to take note of 3 things.
Click on �OK� once we are satisfied with the resolution and the frames per second for each channel. Press �OK� again, to get out of Record Setup and return to the main landing screen.
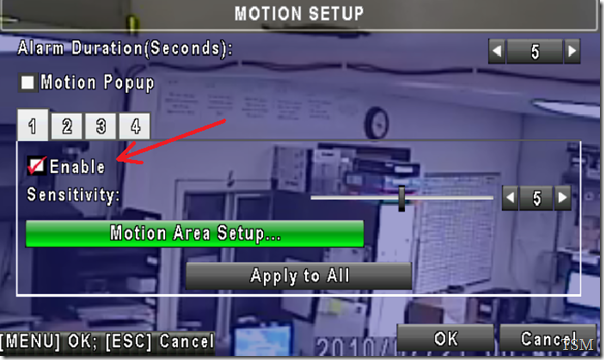
In the main landing screen, please select the Event Setup icon (labeled #2) and then click on the �Motion Setup�� button. Make sure �Enable� is checked for every camera. If we have want to Mask out certain areas of the camera due to a constant roadway or moving tree, etc. This is the place we can mask it.
Once we are satisfied with the settings, let�s click �OK� to get out of it.
H.264 DVR
Back to H.264 Support | Support Home
In this KB, we will go through the process of setting up our new standalone H.264 DVR for (1) Initial Setup, (2) Recording, (3) Playback / Search setup (4) Remote View / Remote Playback (5) Backup to Local PC and USB Flash drive. This guide uses the DVR8024 to demonstrate but the same steps will apply to the 8 and 16 channels as well.
Prerequisites: All the cameras must be plugged in for this exercise. If we have a USB mouse, then let�s make sure that is plugged in, otherwise, we may have to use the front panel buttons to control the operation.
1. Initial Setup
After we have inserted a 3.5� SATA Hard Disk Drive, 4 cameras, and 1 VGA monitor, we should see something like the following.
Notice the black bar in yellow outline at the top. This could mean that we do not have a hard disk drive plugged in or that our plugged in hard drive has not been initialized.
Since I know I just put in a new 1 TB HDD, I�m going to go to the initialize menu and make sure the hard drive is properly formatted in the DVR�s native format. Go to Setup (the gear icon) > Main Menu (the page icon).
We should be brought to the main landing screen. The following screen is an important gateway between this and the next couple of sections in this KB article.
Figure 1. The main landing screen
The icon we want to go to is this icon, it�s Utility icon, labeled #9. Inside the Utility menu, we want to choose �HDD Initialization��
In the following screen, be sure to the blank box next to (1) and click on Start to begin the HDD Initialization.
Choose �Yes� in the corresponding pop-up menu�. Note: This WILL remove all the data on the hard drive, including any previously recorded videos that may exist!
Once the HDD finishes initializing (should only take a few moments). we should notice a few changes, as outlined by the red arrows below. Close out of the menu by pressing on �Close� at the bottom right.
Now, after clicking on �Close� above, we should be back at the Utility screen. This time, choose �System Recovery.�
Choose �Yes� in the corresponding popup menu. Note: This WILL restore all the settings for this system back to factory defaults. i.e. the recording settings, network etc will be reset!
After we have chosen Yes, just click out of the menu and Unplug the power to the DVR. Plug in the power after 15 seconds and our device should be restored back to factory defaults. Continue to the next section for setting up the DVR for recording.
2. Recording
Once section 1 is complete, we will need to set up our DVR for either Motion detect or Around-the-Clock recording. Navigate back to the main menu and choose the Record Setup icon, labeled #1 in Figure 1 above.
In the Record Setup menu, double check to make sure when the HDD is full, it is set to automatically �Overwrite�. Afterwards, head over to the �Quality & Frame Rate Setup��
In the Quality & Frame Rate Setup page, the default filter is set for �View Event.� In this view, we can customize the specific frame rate (FPS) response to an event (such as motion) for every single camera. If we select the �View Normal� filter, we can also select and choose the appropriate FPS response for each camera even if there is no motion (i.e. around-the-clock).
However, for this guide, we will focus on the easiest way to get the most optimized setting. In the figure below, either select �View Event� or �View Normal�, depending on whether we want to do motion detect recording or do around-the-clock recording. Doesn�t matter which one we pick, but I�m choosing the Event recording. Now, we should select a resolution we want to record at, choose a FPS and make sure that it doesn�t exceed the maximum amount allotted by the system. By default, for this 4-channel, it is set to 720�480 resolution at 15FPS.
We want to take note of 3 things.
- 1. If we change this value, it will propagate to all the channels.
2. The FPS will change respectively depending on the recording resolution. If we�re recording at 360 x 240 or 720 x 240, we will be able to obtain 30 FPS. If we�re recording at 720 x 480, then we will only be able to obtain is 15 FPS.
3. We want to click on the �Auto� button if we are seeing anything like 60/240 or 480/240. The first number is the number of frames being recorded and the second number is the total available. Always make sure the 1st number is equal or smaller than the second number.
Click on �OK� once we are satisfied with the resolution and the frames per second for each channel. Press �OK� again, to get out of Record Setup and return to the main landing screen.
In the main landing screen, please select the Event Setup icon (labeled #2) and then click on the �Motion Setup�� button. Make sure �Enable� is checked for every camera. If we have want to Mask out certain areas of the camera due to a constant roadway or moving tree, etc. This is the place we can mask it.
Once we are satisfied with the settings, let�s click �OK� to get out of it.

