
iMaxCamPro (Bronze, Gold, Platinum) setting up recording (locally)
:
from
to
Clear
Clear
Setting up Recording (locally)
Bronze, Gold, and Platinum iMaxCamPro DVR's
Back to iMaxCamPro Support | Support Home
Using a mouse will be much easier to maneuver through all the menu items.
Step 1
Login to the DVR as administrator. Press “Enter” Key for the password prompt. The default username/password is “888888/888888”.
Step 2
Select “CONFIG” from the main menu. Then select “RECORD”
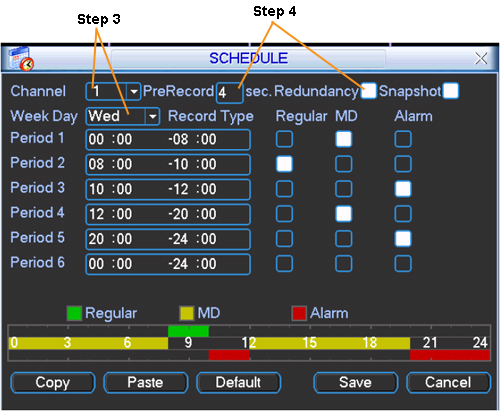
Step 3
This is the main menu you will need to setup all your types of recordings for the DVR (except for extra settings with motion detection and alarm recordings so check for additional walkthroughs if needed). Start off by picking the channel (to apply to every channel select “All”) at the top left of the screen and also the day of the week (to apply to everyday select “All”).
Step 4
You also have options to use prerecording and redundancy. Prerecording will give you a pre determined time (usually 5 to 10 seconds) of buffered video. Redundancy will “mirror” your recordings to another (if you have another) hard drive that’s installed in your system. Check for additional walkthroughs for more information on both subjects.
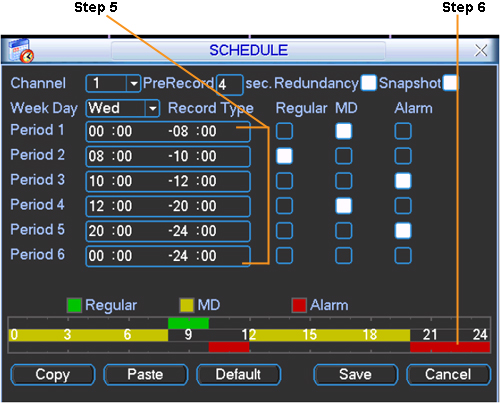
Step 5
The periods below (1 through 6) are meant for you to break down a total day in to different time periods. For example you may want motion detection (“MD”) to be active from 12:00am to 6:00am so period 1 should read “00:00” to “06:00” (remember its in GMT time) and the “MD” box should be highlighted white. Now say you want continuous recording (“Regular”) for the rest of the day so period 2 should read “06:00” to “24:00” and the “Regular” box should be highlighted white.
Step 6
The graph below the periods will indicate a whole days recordings in color coded form. You will see the times listed and the color belonging to what type of recording it’s currently on from the key legend above. Once satisfied with your settings, click on the “Save” button below.
Bronze, Gold, and Platinum iMaxCamPro DVR's
Back to iMaxCamPro Support | Support Home
Using a mouse will be much easier to maneuver through all the menu items.
Step 1
Login to the DVR as administrator. Press “Enter” Key for the password prompt. The default username/password is “888888/888888”.
Step 2
Select “CONFIG” from the main menu. Then select “RECORD”
Step 3
This is the main menu you will need to setup all your types of recordings for the DVR (except for extra settings with motion detection and alarm recordings so check for additional walkthroughs if needed). Start off by picking the channel (to apply to every channel select “All”) at the top left of the screen and also the day of the week (to apply to everyday select “All”).
Step 4
You also have options to use prerecording and redundancy. Prerecording will give you a pre determined time (usually 5 to 10 seconds) of buffered video. Redundancy will “mirror” your recordings to another (if you have another) hard drive that’s installed in your system. Check for additional walkthroughs for more information on both subjects.
Step 5
The periods below (1 through 6) are meant for you to break down a total day in to different time periods. For example you may want motion detection (“MD”) to be active from 12:00am to 6:00am so period 1 should read “00:00” to “06:00” (remember its in GMT time) and the “MD” box should be highlighted white. Now say you want continuous recording (“Regular”) for the rest of the day so period 2 should read “06:00” to “24:00” and the “Regular” box should be highlighted white.
Step 6
The graph below the periods will indicate a whole days recordings in color coded form. You will see the times listed and the color belonging to what type of recording it’s currently on from the key legend above. Once satisfied with your settings, click on the “Save” button below.