
iMaxCamPro (Bronze, Gold, Platinum) setting up DVR with No-IP DDNS
:
from
to
Clear
Clear
Setting up an iMaxCamPro (Bronze, Gold, or Platinum) DVR with No-IP DDNS
Bronze, Gold, and Platinum iMaxCamPro DVR's
Back to iMaxCamPro Support | Support Home
Using the No-IP DDNS service with your iMaxCamPro (Bronze, Gold, or Platinum class) DVR will allow you to access your DVR by name from the Internet using Internet Explorer or the PSS client software even though the IP address may frequently change. These instructions will configure the DVR to provide periodic updates to the No-IP site. The No-IP service will allow you to create up to 5 hosts without a fee.
Step 1
Go to http://www.no-ip.com and create an account.
Step 2
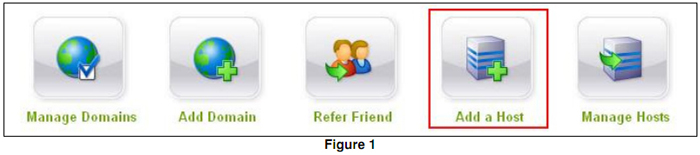
After creating your account, click on My Hosts from within the My Services section (Figure 1).
Step 3
Click on the Add a Host button.
Step 4
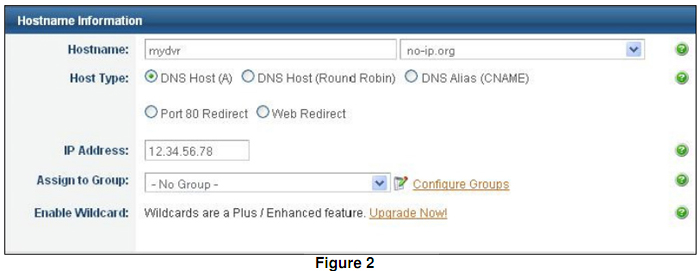
From the Add a host screen, configure the following options (Figure 2):
You may configure the DVR using either console interface, Internet Explorer or the Professional Surveillance System (PSS) client software, for this document we will use Internet Explorer.
Step 6
Connect and log into your DVR using the administrator account (admin) using Internet Explorer.
Step 7
From the main screen, click on the Config tab at the top of the video windows (Figure 4).

Step 8
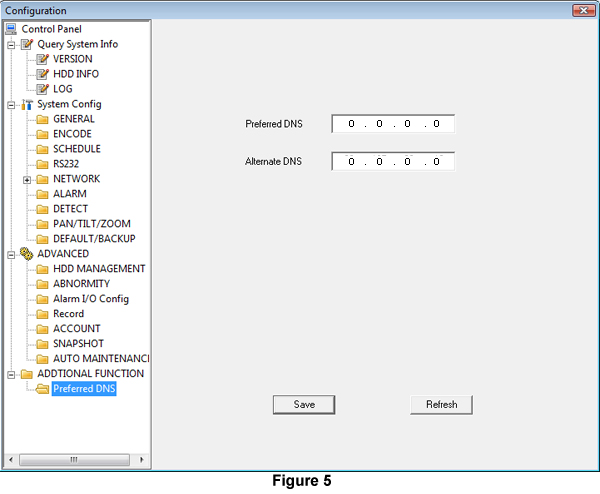
The first step of the DVR configuration is to ensure that you have a valid entry for the Preferred DNS information. Within the Configuration window, click on Preferred DNS on the left hand side at the bottom and provide the appropriate IP address information on the right side (Figure 5) then press Save. If you need help in finding the appropriate IP information for your DNS server, see Appendix A.
Step 9
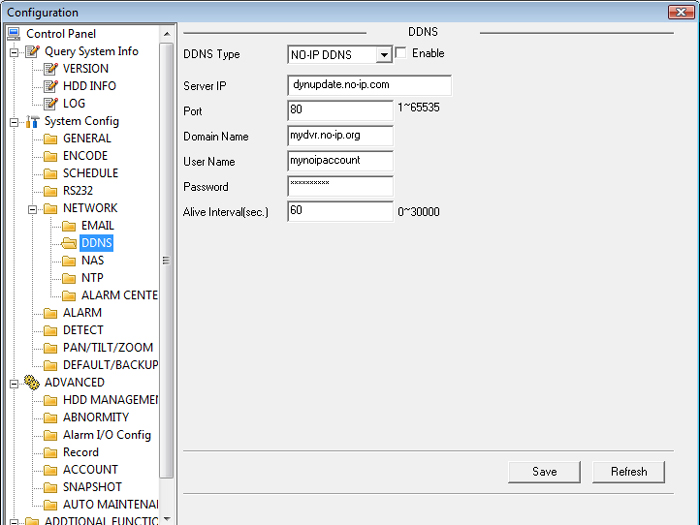
On the left hand side of the Configuration window click on the plus sign (+) next to NETWORK to expand that section and click on the entry labeled DDNS. To the right of DDNS Type click on the down arrow and select NO-IP DDNS from the pull-down menu. Fill in the fields with the following information (Figure 6) and then click on the Save button:
Step 10
Close the configuration windows by clicking on the X in the top right corner.
Appendix A. Finding Your DNS Server IP Information
In order to find your DNS server IP information you will need to access a command prompt from your local PC. Go to the Windows Start menu and choose Programs or All Programs and then Accessories and Command Prompt. Once a command prompt window opens, type in the following command ipconfig /all and press Enter. Several lines of information will scroll through the window but the specific information you need is listed under the heading DNS Servers which should be the third line from the bottom (Figure 7).

*** NOTE *** The IP information in Figure 7 above, is for demonstration purposes only and should not be used for your configuration.
Bronze, Gold, and Platinum iMaxCamPro DVR's
Back to iMaxCamPro Support | Support Home
Using the No-IP DDNS service with your iMaxCamPro (Bronze, Gold, or Platinum class) DVR will allow you to access your DVR by name from the Internet using Internet Explorer or the PSS client software even though the IP address may frequently change. These instructions will configure the DVR to provide periodic updates to the No-IP site. The No-IP service will allow you to create up to 5 hosts without a fee.
Step 1
Go to http://www.no-ip.com and create an account.
Step 2
After creating your account, click on My Hosts from within the My Services section (Figure 1).
Step 3
Click on the Add a Host button.
Step 4
From the Add a host screen, configure the following options (Figure 2):
- a)Hostname: The name by which you will access your DVR. You will need to select the domain name
from a pull-down menu of predefined domains.
b)Host Type: Select DNS Host (A).
c)IP Address: Your current IP address will be used for this field initially. This is fine, when the DVR sends an update it will overwrite this if necessary.
d) Press the Create Host button to continue.
- e) You will return to the Manage Hosts screen and your newly created host record will be displayed.
** NOTE ** The Manage Hosts screen is a useful tool for troubleshooting problems with the DDNS setup. Clicking on the Modify link associated with your host will show you the current IP address and also the date and time of the last update from the DVR (Figure 3).

You may configure the DVR using either console interface, Internet Explorer or the Professional Surveillance System (PSS) client software, for this document we will use Internet Explorer.
Step 6
Connect and log into your DVR using the administrator account (admin) using Internet Explorer.
Step 7
From the main screen, click on the Config tab at the top of the video windows (Figure 4).
Step 8
The first step of the DVR configuration is to ensure that you have a valid entry for the Preferred DNS information. Within the Configuration window, click on Preferred DNS on the left hand side at the bottom and provide the appropriate IP address information on the right side (Figure 5) then press Save. If you need help in finding the appropriate IP information for your DNS server, see Appendix A.
Step 9
On the left hand side of the Configuration window click on the plus sign (+) next to NETWORK to expand that section and click on the entry labeled DDNS. To the right of DDNS Type click on the down arrow and select NO-IP DDNS from the pull-down menu. Fill in the fields with the following information (Figure 6) and then click on the Save button:
- a)Enable: Click on the box next to this so that a check mark appears.
b) Server IP: dynupdate.no-ip.com
c)Port: 80
d)Domain Name: (The Hostname you created on No-IP.com in step 4)
e) User Name: (Your No-IP.com username)
f)Password: (Your No-IP.com password)
g)Alive Interval(sec.): 60
Step 10
Close the configuration windows by clicking on the X in the top right corner.
Appendix A. Finding Your DNS Server IP Information
In order to find your DNS server IP information you will need to access a command prompt from your local PC. Go to the Windows Start menu and choose Programs or All Programs and then Accessories and Command Prompt. Once a command prompt window opens, type in the following command ipconfig /all and press Enter. Several lines of information will scroll through the window but the specific information you need is listed under the heading DNS Servers which should be the third line from the bottom (Figure 7).
*** NOTE *** The IP information in Figure 7 above, is for demonstration purposes only and should not be used for your configuration.