
iMaxCamPro (Bronze, Gold, Platinum) setting up Ddns
:
from
to
Clear
Clear
Setting Up DDNS [DynDNS.com]
Bronze, Gold, and Platinum iMaxCamPro DVR's
Back to iMaxCamPro Support | Support Home
Step 1
Start by getting in to the “Network” menu of the unit. Main menu > Settings >Network.
Step 2
Now double click on the “DDNS” option in the panel at the bottom. If you do not see it at first, use the scroll bar to the right of the panel.
You should now see a menu as shown below.
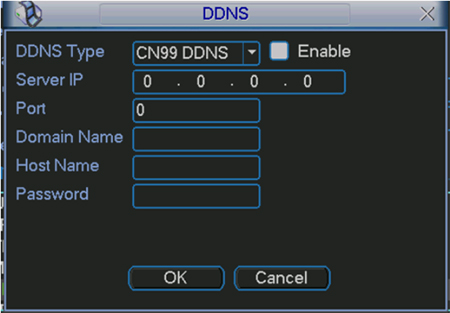
Step 3
We will be using DynDNS.com as the demo for setting up DDNS on the unit. Select “DynDNS” from the drop down that indicates “DDNS Type”. Now click on the “Enable” box to activate the function.
Step 4
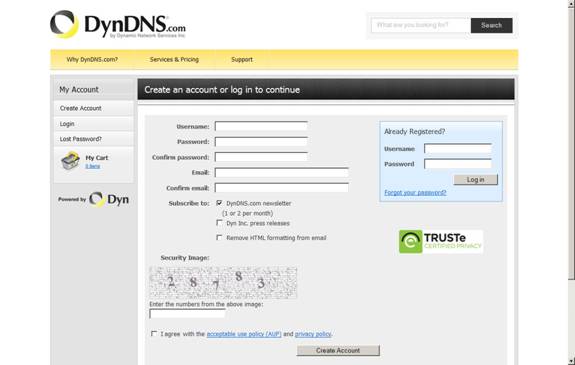
We will first have to create an account through http://www.dyndns.com to enter in all information needed in this menu. Once at the website click on “Sign up FREE” where the User Login input boxes are located. You will now see the following screen below. Fill in all necessary information making sure the e-mail address you are using is valid since the site will be sending it an activation notice.
Step 5
After successfully signing up, check your e-mail for an activation message to confirm your registration to the site. Once confirmed, you should now be able to login through DynDNS’s homepage and get to your member console by clicking the “My Account” option at the top of the page.
Step 6
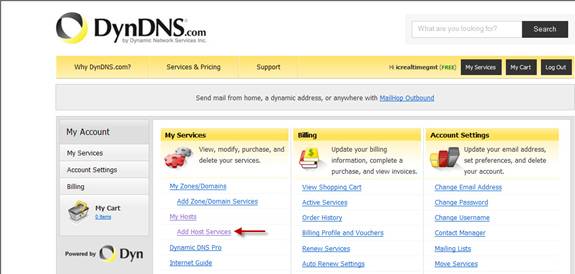
Now that you have your account created we have to generate a host for the DVR to update its WAN IP address on. Click the “Add Host” icon when your member console opens.
Step 7
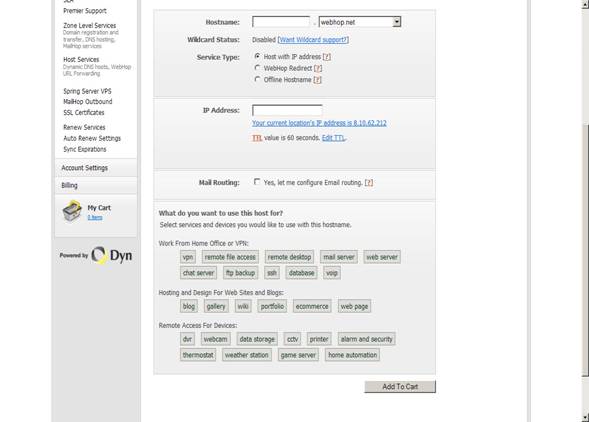
The first question it asks you is to create a host name. Fill in a unique name followed with a pre determined domain on the right. This will form the complete host name you will be using to access the DVR from now on. The host type is for advanced DNS redirection/functionality; keep it set to “Host with IP address” for what we are doing. Now type in an IP address which does not need to be valid since when we set this up on to the DVR it will update the host with the correct IP address that is being assigned for that location. You may want to choose to select “DVR” for the type of device you are using the service for. All further information is null for what we need to do so click on “Add to Cart” to finish.
Step 8
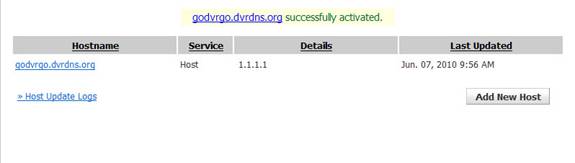
Proceed with the additional information it asks while finalizing the host. The first 5 host you create should be free and should not be charged. After the host is activated, you should be redirected back to the manage host console where you should now see your newly created host name. We will be using the host name that has already been created shown below as an example from this step on.
Step 9
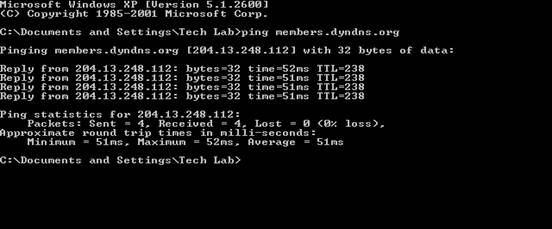
Now that the DDNS host name has been created for the DVR to use, we simply need to find out the update server we need to use to keep it current with the IP address. To find out the IP address we will need to ping the domain name members.dyndns.org. Bring up a command line prompt box by typing in “CMD” from the run or search box through your start option through Windows. Now type in the command box ping members.dyndns.org which will display results in the picture displayed below. Write down the IP address that the domain name resolves. Note: you may use the host name of the update server “members.dyndns.org” if you have your DNS settings enabled and are valid.
Step 10
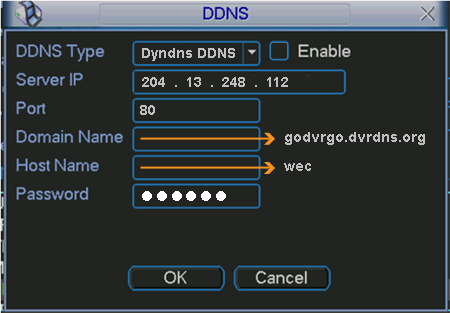
“DDNS Type” is set to “DynDNS” and the “Enable” box is highlighted white. First enter in the Server IP for what we got when we pinged members.dyndns.org or just use the host name it self if DNS is enabled for your DVR. Use the defaulted HTTP port of 80 for your “Port” option. Now enter in the full domain name you used to create a new host through DynDNS. For an example we used the one from a couple screen shots above. The “Host Name” refers to the username that you used to signup to DynDNS with. As you probably already guessed, the “Password” refers to the password you used to setup with the host name. If all is completed properly, you should now be able to check the host from DynDNS and see that it has updated it with the most current IP address issued for that location. You may now use the domain name to login remotely. The DVR will act as the update device to tell DynDNS if the location’s IP address has changed. Note: it may take several minutes for the service to fully update and notice the change.
Note: To add your local DNS settings to the DVR, navigate to Main menu > Settings > Network > Advanced Options > DNS. You can find the local DNS server of your network by opening your command prompt (start > run > cmd) and type in “ipconfig /all”. You should see your primary and secondary DNS servers listed in the information given.
Bronze, Gold, and Platinum iMaxCamPro DVR's
Back to iMaxCamPro Support | Support Home
Step 1
Start by getting in to the “Network” menu of the unit. Main menu > Settings >Network.
Step 2
Now double click on the “DDNS” option in the panel at the bottom. If you do not see it at first, use the scroll bar to the right of the panel.
You should now see a menu as shown below.
Step 3
We will be using DynDNS.com as the demo for setting up DDNS on the unit. Select “DynDNS” from the drop down that indicates “DDNS Type”. Now click on the “Enable” box to activate the function.
Step 4
We will first have to create an account through http://www.dyndns.com to enter in all information needed in this menu. Once at the website click on “Sign up FREE” where the User Login input boxes are located. You will now see the following screen below. Fill in all necessary information making sure the e-mail address you are using is valid since the site will be sending it an activation notice.
Step 5
After successfully signing up, check your e-mail for an activation message to confirm your registration to the site. Once confirmed, you should now be able to login through DynDNS’s homepage and get to your member console by clicking the “My Account” option at the top of the page.
Step 6
Now that you have your account created we have to generate a host for the DVR to update its WAN IP address on. Click the “Add Host” icon when your member console opens.
Step 7
The first question it asks you is to create a host name. Fill in a unique name followed with a pre determined domain on the right. This will form the complete host name you will be using to access the DVR from now on. The host type is for advanced DNS redirection/functionality; keep it set to “Host with IP address” for what we are doing. Now type in an IP address which does not need to be valid since when we set this up on to the DVR it will update the host with the correct IP address that is being assigned for that location. You may want to choose to select “DVR” for the type of device you are using the service for. All further information is null for what we need to do so click on “Add to Cart” to finish.
Step 8
Proceed with the additional information it asks while finalizing the host. The first 5 host you create should be free and should not be charged. After the host is activated, you should be redirected back to the manage host console where you should now see your newly created host name. We will be using the host name that has already been created shown below as an example from this step on.
Step 9
Now that the DDNS host name has been created for the DVR to use, we simply need to find out the update server we need to use to keep it current with the IP address. To find out the IP address we will need to ping the domain name members.dyndns.org. Bring up a command line prompt box by typing in “CMD” from the run or search box through your start option through Windows. Now type in the command box ping members.dyndns.org which will display results in the picture displayed below. Write down the IP address that the domain name resolves. Note: you may use the host name of the update server “members.dyndns.org” if you have your DNS settings enabled and are valid.
Step 10
“DDNS Type” is set to “DynDNS” and the “Enable” box is highlighted white. First enter in the Server IP for what we got when we pinged members.dyndns.org or just use the host name it self if DNS is enabled for your DVR. Use the defaulted HTTP port of 80 for your “Port” option. Now enter in the full domain name you used to create a new host through DynDNS. For an example we used the one from a couple screen shots above. The “Host Name” refers to the username that you used to signup to DynDNS with. As you probably already guessed, the “Password” refers to the password you used to setup with the host name. If all is completed properly, you should now be able to check the host from DynDNS and see that it has updated it with the most current IP address issued for that location. You may now use the domain name to login remotely. The DVR will act as the update device to tell DynDNS if the location’s IP address has changed. Note: it may take several minutes for the service to fully update and notice the change.
Note: To add your local DNS settings to the DVR, navigate to Main menu > Settings > Network > Advanced Options > DNS. You can find the local DNS server of your network by opening your command prompt (start > run > cmd) and type in “ipconfig /all”. You should see your primary and secondary DNS servers listed in the information given.