
iMaxCamPro (Bronze, Gold, Platinum) setting up alarm based recording
:
from
to
Clear
Clear
How to Setup Alarm Based Recording
Bronze, Gold, and Platinum iMaxCamPro DVR's
Back to iMaxCamPro Support | Support Home
Step 1
Login to the DVR as administrator. Press “Enter” Key for the password prompt. The default username/password is “888888/888888”.
Step 2
Select the “CONFIG” menu
Step 3
Then select the “RECORD” menu
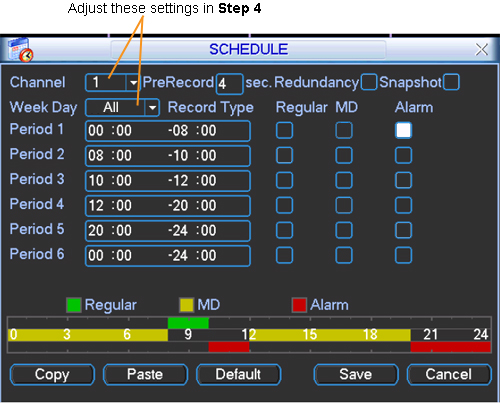
Step 4
Once in the “RECORD” menu, choose the channel and day of the week on which you will be using alarm based recording.
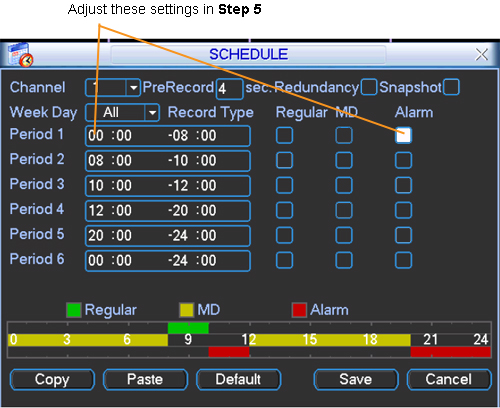
Step 5
You can either use the default time period (00:00 – 24:00), or set your own period to record within. Make sure the Alarm box is highlighted next to your time period.
Step 6
Repeat steps 4-5 for each additional channel that will use alarm based recording.
Step 7
Click “SAVE” at the bottom of the window.
Step 8
You should now be back inside of the “CONFIG” menu. Select the “ALARM” menu.
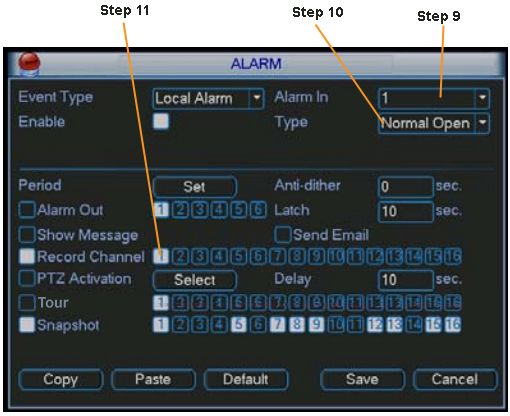
Step 9
Select the Alarm input at the top (1-8 IN corresponds to 1-8 in the back of the DVR)
Step 10
The “Type” drop down menu refers to the type of circuit the alarm trigger is, either Normal
Open, or Normal Close.
Step 11
Under Record Channel, choose which cameras you wish to record when the alarm is triggered.
Step 12
The “Source of alarm” drop down menu should be set to “Local Input”.
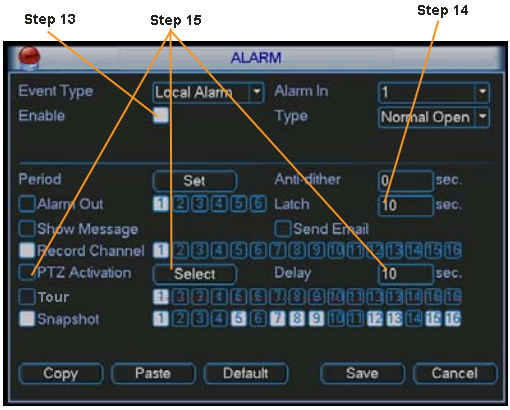
Step 13
You have the option of starting a tour when the alarm is triggered as well. If you enable the tour, the screen will switch to the 9-way view when the alarm is triggered. Note: No other tour can be selected for this option.
Step 14
The Latch setting determines how long the recording continues after the alarm is stopped. (Minimum 10 seconds, Maximum 300 seconds)
Step 15
You can also have Pan-Tilt-Zoom cameras switch to a preset when the alarm is triggered by pushing “SET” next to “PTZ Preset” and select the number of the preset.
Step 16
There are also 3 Alarm Out slots. These can be used to trigger an external device when the alarm in is triggered.
Step 17
Repeat steps 9-16 for each additional alarm input.
Additional Notes Pertaining to Alarm Inputs/Outputs:
- To display the particular channel in the large window; If any channel is selected for recording by Alarm, then the 8-window (1 large, 7 small) view will popup when the alarm is triggered. Any channels selected for recording will be displayed in the large window in a circular way. Of course, if there is only one camera is selected, this camera will stay in the large window. The circulation view will stop after the recording stops. But keep in mind, the window will not resume to the previous state before the alarm happens, it will stay at the 8-window view.
- You may also trigger the predefined Tour which can be configured under the DISPLAY configuration menu. The tour should stop after the delay time passes.
- You may also activate the warning message so that one window will popup when the alarm happens.
Bronze, Gold, and Platinum iMaxCamPro DVR's
Back to iMaxCamPro Support | Support Home
Step 1
Login to the DVR as administrator. Press “Enter” Key for the password prompt. The default username/password is “888888/888888”.
Step 2
Select the “CONFIG” menu
Step 3
Then select the “RECORD” menu
Step 4
Once in the “RECORD” menu, choose the channel and day of the week on which you will be using alarm based recording.
Step 5
You can either use the default time period (00:00 – 24:00), or set your own period to record within. Make sure the Alarm box is highlighted next to your time period.
Step 6
Repeat steps 4-5 for each additional channel that will use alarm based recording.
Step 7
Click “SAVE” at the bottom of the window.
Step 8
You should now be back inside of the “CONFIG” menu. Select the “ALARM” menu.
Step 9
Select the Alarm input at the top (1-8 IN corresponds to 1-8 in the back of the DVR)
Step 10
The “Type” drop down menu refers to the type of circuit the alarm trigger is, either Normal
Open, or Normal Close.
Step 11
Under Record Channel, choose which cameras you wish to record when the alarm is triggered.
Step 12
The “Source of alarm” drop down menu should be set to “Local Input”.
Step 13
You have the option of starting a tour when the alarm is triggered as well. If you enable the tour, the screen will switch to the 9-way view when the alarm is triggered. Note: No other tour can be selected for this option.
Step 14
The Latch setting determines how long the recording continues after the alarm is stopped. (Minimum 10 seconds, Maximum 300 seconds)
Step 15
You can also have Pan-Tilt-Zoom cameras switch to a preset when the alarm is triggered by pushing “SET” next to “PTZ Preset” and select the number of the preset.
Step 16
There are also 3 Alarm Out slots. These can be used to trigger an external device when the alarm in is triggered.
Step 17
Repeat steps 9-16 for each additional alarm input.
Additional Notes Pertaining to Alarm Inputs/Outputs:
- To display the particular channel in the large window; If any channel is selected for recording by Alarm, then the 8-window (1 large, 7 small) view will popup when the alarm is triggered. Any channels selected for recording will be displayed in the large window in a circular way. Of course, if there is only one camera is selected, this camera will stay in the large window. The circulation view will stop after the recording stops. But keep in mind, the window will not resume to the previous state before the alarm happens, it will stay at the 8-window view.
- You may also trigger the predefined Tour which can be configured under the DISPLAY configuration menu. The tour should stop after the delay time passes.
- You may also activate the warning message so that one window will popup when the alarm happens.