
GeoVision Video Backup Procedure
:
from
to
Clear
Clear
Video Backup Procedure
for GeoVision
Back to GeoVision Support | Support Home
Before you Start
- If you are looking to save only a video clip, or a series of video clips shorter than 60 minutes, then use �Save as AVI� option
- If you are looking to backup multiple video clips with total length more than 60 minutes, then use �Backup� option ����� - The backup option also allow you to burn video files directly onto the CD/DVD using Nero application
Save as AVI
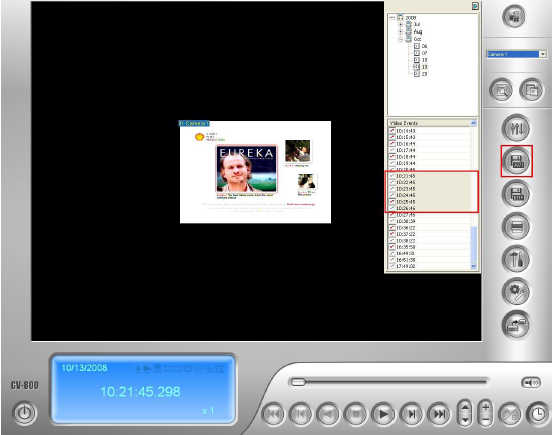
1. In GeoVision Viewlog software, select the time and date and select the video event (or highlight multiple video events) which you wish to save. Click on Save as AVI button on the right
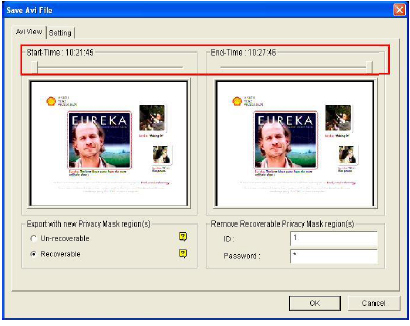
2. Select the desired Start and End time if you prefer to extract only a segment of the video file(s) selected
3. Under Setting tab, select the location on your system where you would like the video file(s) to be saved into by clicking on ��..� button on the right
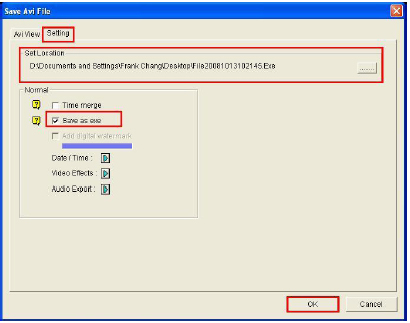
4. Check on the option to Save as exe
5. Click OK to save the desired video file(s) into above destination
Why do you need to check on �Save as exe�?
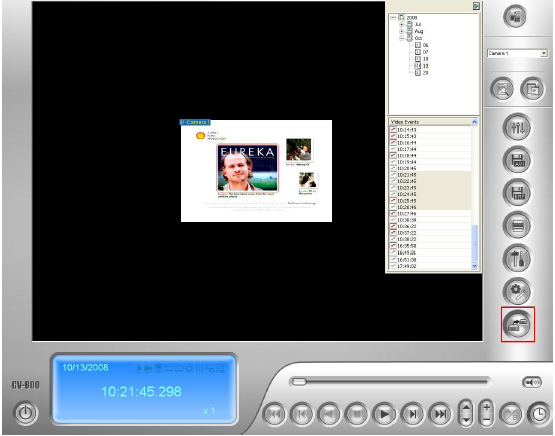
6. In GeoVision Viewlog software, click on Backup button on the right
7. In the Backup window, select how you would want to backup your video files through either Hard Disk, CD/DVD, or OS-Burning
8. Select Add timeframe to proceed
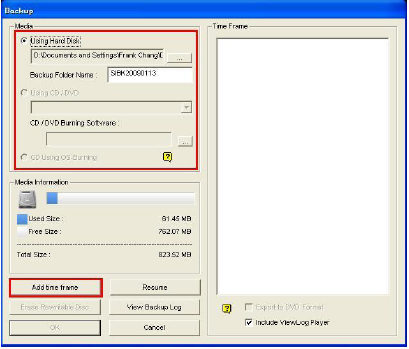
In order to use direct burning onto CD/DVD or OS-Burning, you will need GeoVision supported burning software pre-installed on your system. Otherwise, you may backup onto hard disk first then burn the desired files onto CD/DVD using the software of your choice.
9. Select the desired time period by assigning the Start and End Time. Once you have selected your time period, the software will automatically search for video and audio files within that time period and display the total number of files on the right
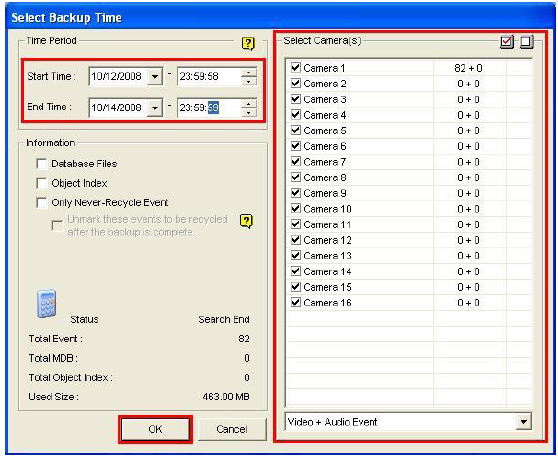
10. Check on the cameras which you would like to backup your video/audio files then click OK
11. In the Backup window, confirm the time frame and the size of the files on the right

12. Check on Include ViewLog Player option
13. Click on OK to back up selected files to destination
for GeoVision
Back to GeoVision Support | Support Home
Before you Start
- If you are looking to save only a video clip, or a series of video clips shorter than 60 minutes, then use �Save as AVI� option
- If you are looking to backup multiple video clips with total length more than 60 minutes, then use �Backup� option ����� - The backup option also allow you to burn video files directly onto the CD/DVD using Nero application
Save as AVI
1. In GeoVision Viewlog software, select the time and date and select the video event (or highlight multiple video events) which you wish to save. Click on Save as AVI button on the right
2. Select the desired Start and End time if you prefer to extract only a segment of the video file(s) selected
3. Under Setting tab, select the location on your system where you would like the video file(s) to be saved into by clicking on ��..� button on the right
4. Check on the option to Save as exe
5. Click OK to save the desired video file(s) into above destination
Why do you need to check on �Save as exe�?
-
- If you extract the video files with the option checked, your video files will be extracted as .exe files instead of .avi files. The execution file will include a copy of the GeoVision video codec, which would be required to view the saved .avi file.
- If you have saved the video files without the �Save as exe� option checked, then it may be necessary to install GeoVision video codec separately when you are viewing the clip on a system which never played GeoVision video recordings before. �����* You may download GeoVision video codec from GeoVision website at http://www.usavisionsys.com/download
6. In GeoVision Viewlog software, click on Backup button on the right
7. In the Backup window, select how you would want to backup your video files through either Hard Disk, CD/DVD, or OS-Burning
8. Select Add timeframe to proceed
In order to use direct burning onto CD/DVD or OS-Burning, you will need GeoVision supported burning software pre-installed on your system. Otherwise, you may backup onto hard disk first then burn the desired files onto CD/DVD using the software of your choice.
9. Select the desired time period by assigning the Start and End Time. Once you have selected your time period, the software will automatically search for video and audio files within that time period and display the total number of files on the right
10. Check on the cameras which you would like to backup your video/audio files then click OK
11. In the Backup window, confirm the time frame and the size of the files on the right
12. Check on Include ViewLog Player option
13. Click on OK to back up selected files to destination
-
- Why do you need to check on �Include ViewLog Player�?
�����- With Viewlog Player extracted, you may use EZViewlog to view the video/audio files when playing back the video. Otherwise, you will need to playback the video/audio files through Windows Media Player.