
Assigning iMaxCamPro IP Cameras Static Addresses
Bronze, Gold, and Platinum iMaxCamPro DVR's
Back to iMaxCamPro Support | Support Home
The purpose of his guide is to show you how to assign static IP address to iMaxCamPro IP cameras that you might have on your network, that aren't directly connected to your NVR.
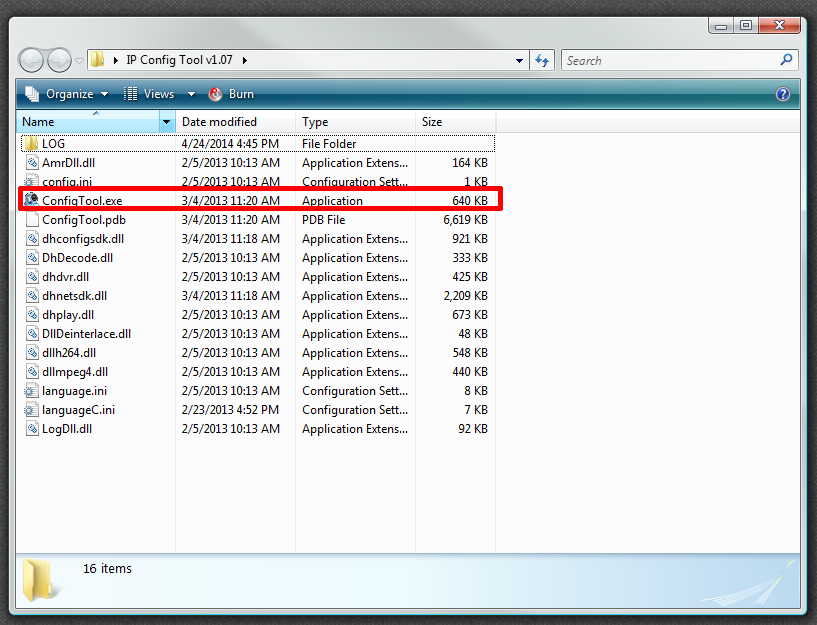
First, you must download the IP Configuration Utiltiy located here.. Extract that file and then open up the folder that it created. Double click on the file show below:
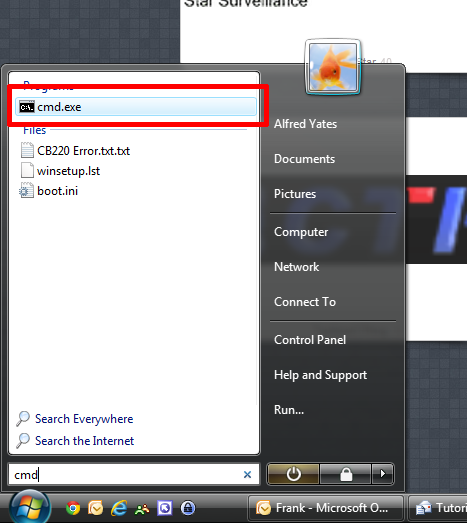
Next, click on your Start Menu (or hit "Windows key-R") and start typing the letters "cmd" and hit the "Enter" key.
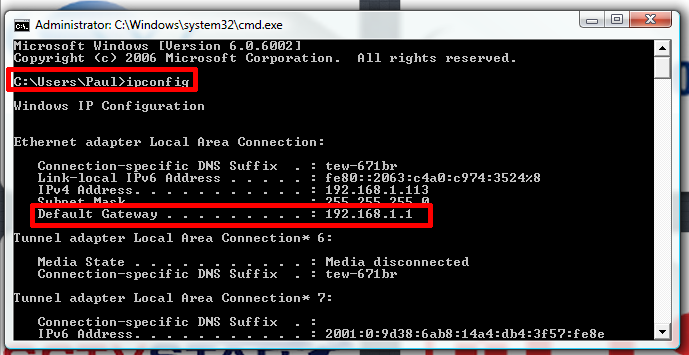
In the command window that was opened, type in "ipconfig" and hit Enter. This will display the network information for your local network and PC. For the "Ethernet adapter Local Area Connection" or "Wireless LAN adapter", make note of the "Default Gateway" being used.
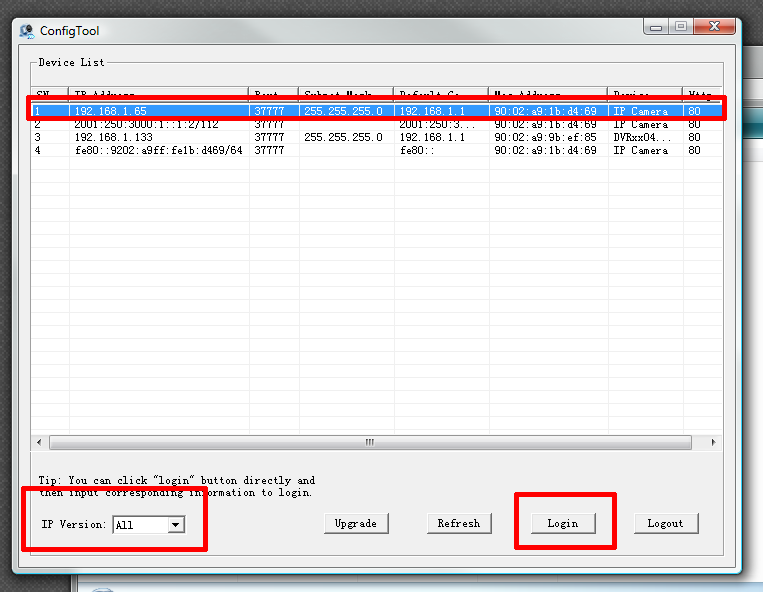
Now in the ConfigTool window that was launched earlier, near the bottom left of the window, select "IPv4" from the IP Version selection field and you should see some listings for the IP cameras connected. Click on the first one listed and then click on the "Login" button.
You should then see one of the following two windows appear:
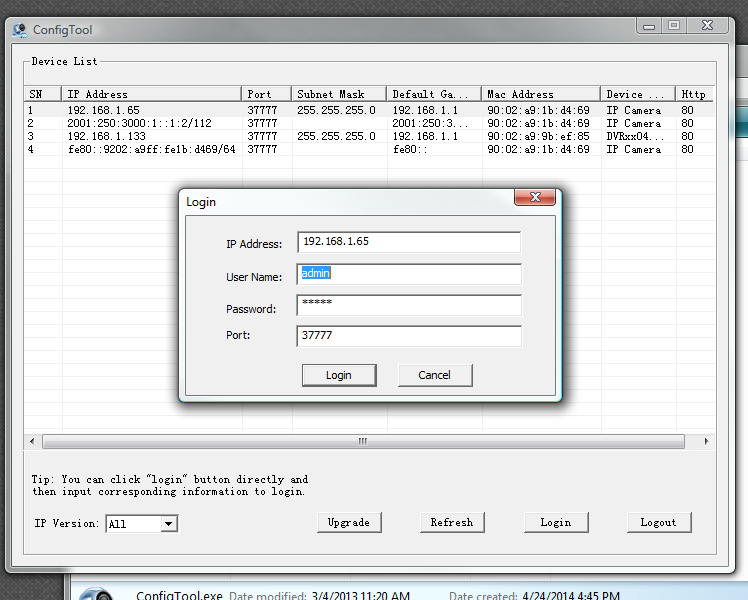
(A)
(B)
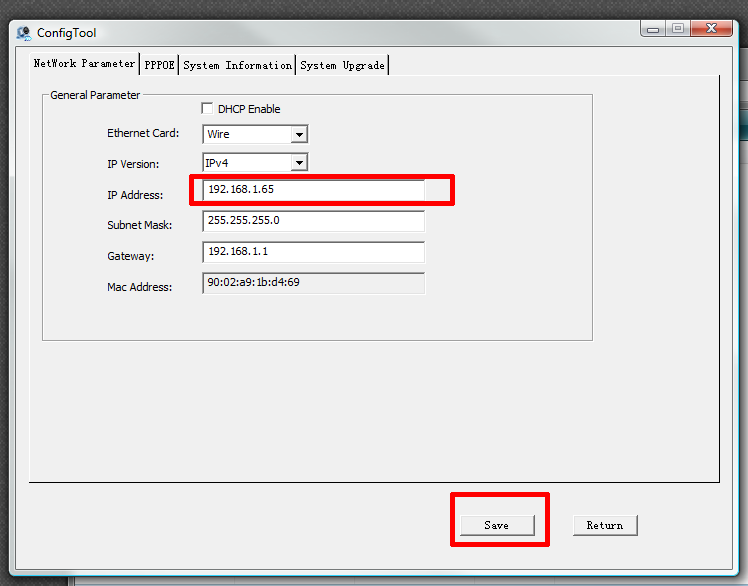
If you see something that looks like the window (A), then it means that your cameras are already accessible on the network out of the box. It would be best to change their addresses to something permanent on the network, in the event that the router might restart and new addresses are assigned to the cameras. To do this, first click on the "Login" button, which should log you into the configuration interface as seen below. In the IP address field, it would be best to change the last octet (last numbers after the last period) to a number in the higher end of addresses (200-255). For example, you could start numbering the beginning with .201 and continuing down the line. For the first camera, change the last octet to the value of 201. In this example, the new address you are assigning the cameras would be 192.168.1.201. After you change the last octet, click on the "Save" button.
This should take you back to the main ConfigTool window and now the address should reflect the change you made. You will need to repeat the process of login and changing of addresses for each of the other cameras you plan to have on your network, changing the last octet to the next number in the sequence (202,203, etc.).
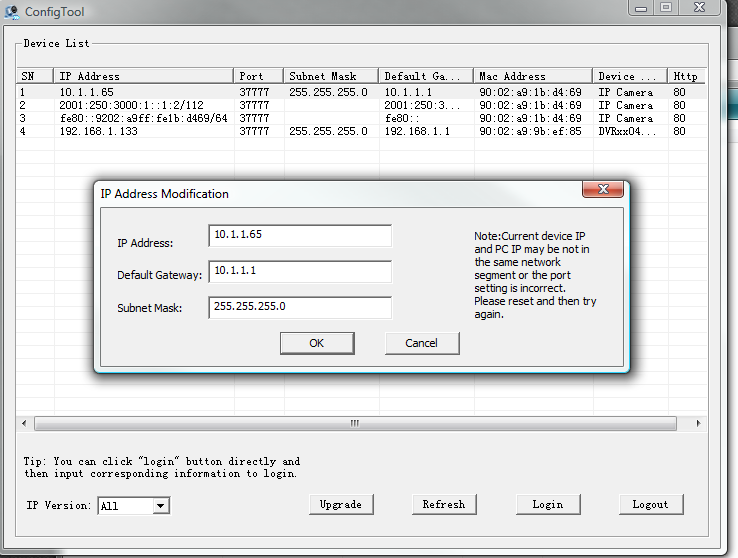
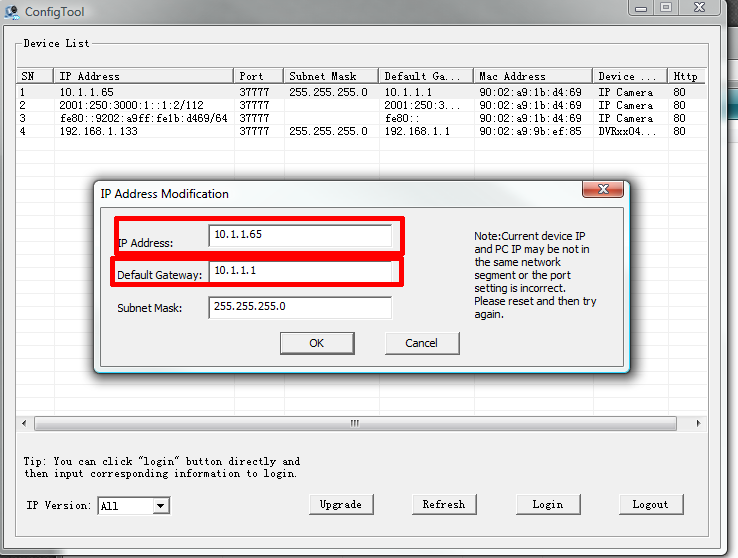
If you happen to see a window similar to what you see for window (B), then it means that your camera(s) did not automatically join your network. As described in the last few steps, you will need to assign each camera a separate address, and for this example, you are going to choose the values of 201,202,etc.. in the last octet of each IP address for Cameras 1,2, etc. If you see the window below, for Camera 1, you will need to change the "Default Gateway" field to match the Default Gateway you noted from the Command Window. For the "IP Address", you will need to type in an address where the first three numbers (octets) will match the first three numbers of your Default Gateway. For example, if your Default Gateway is 192.168.1.1, then proper addresses on that network would range from 192.168.168.1.2 to 192.168.1.255. The last number (octet) will need to be 201 in this example for the first camera you are configuring. So for this example, you will be typing in "192.168.1.201" in the "IP Address" field. After you have entered in these changes, click the "OK" button and make sure the prompt tells you that it has successfully changed the IP address. If not, you will have to try to make the changes again or call us and we can try to diagnose what the issue is. This step will have to be repeated for each additional camera on the network, but making sure that the IP address is different for each camera.
Now with every camera successfully on the network, you should be able to then scan for them using our iMaxCamPro NVRs or find them with an NVR software that can scan and use ONVIF compatible IP cameras.
{* OLD UNRESPONSIVE HTML CODE Bronze, Gold, and Platinum iMaxCamPro DVR'sBack to iMaxCamPro Support | Support Home
The purpose of his guide is to show you how to assign static IP address to iMaxCamPro IP cameras that you might have on your network, that aren't directly connected to your NVR.
First, you must download the IP Configuration Utiltiy located here. Extract that file and then open up the folder that it created. Double click on the file show below:

Next, click on your Start Menu (or hit "Windows key-R") and start typing the letters "cmd" and hit the "Enter" key.

In the command window that was opened, type in "ipconfig" and hit Enter. This will display the network information for your local network and PC. For the "Ethernet adapter Local Area Connection" or "Wireless LAN adapter", make note of the "Default Gateway" being used.

Now in the ConfigTool window that was launched earlier, near the bottom left of the window, select "IPv4" from the IP Version selection field and you should see some listings for the IP cameras connected. Click on the first one listed and then click on the "Login" button.

You should then see one of the following two windows appear:
(A)

(B)

If you see something that looks like the window (A), then it means that your cameras are already accessible on the network out of the box. It would be best to change their addresses to something permanent on the network, in the event that the router might restart and new addresses are assigned to the cameras. To do this, first click on the "Login" button, which should log you into the configuration interface as seen below. In the IP address field, it would be best to change the last octet (last numbers after the last period) to a number in the higher end of addresses (200-255). For example, you could start numbering the beginning with .201 and continuing down the line. For the first camera, change the last octet to the value of 201. In this example, the new address you are assigning the cameras would be 192.168.1.201. After you change the last octet, click on the "Save" button.

This should take you back to the main ConfigTool window and now the address should reflect the change you made. You will need to repeat the process of login and changing of addresses for each of the other cameras you plan to have on your network, changing the last octet to the next number in the sequence (202,203, etc.).
If you happen to see a window similar to what you see for window (B), then it means that your camera(s) did not automatically join your network. As described in the last few steps, you will need to assign each camera a separate address, and for this example, you are going to choose the values of 201,202,etc.. in the last octet of each IP address for Cameras 1,2, etc. If you see the window below, for Camera 1, you will need to change the "Default Gateway" field to match the Default Gateway you noted from the Command Window. For the "IP Address", you will need to type in an address where the first three numbers (octets) will match the first three numbers of your Default Gateway. For example, if your Default Gateway is 192.168.1.1, then proper addresses on that network would range from 192.168.168.1.2 to 192.168.1.255. The last number (octet) will need to be 201 in this example for the first camera you are configuring. So for this example, you will be typing in "192.168.1.201" in the "IP Address" field. After you have entered in these changes, click the "OK" button and make sure the prompt tells you that it has successfully changed the IP address. If not, you will have to try to make the changes again or call us and we can try to diagnose what the issue is. This step will have to be repeated for each additional camera on the network, but making sure that the IP address is different for each camera.

Now with every camera successfully on the network, you should be able to then scan for them using our iMaxCamPro NVRs or find them with an NVR software that can scan and use ONVIF compatible IP cameras.
*}