
Geovision FAQ
:
from
to
Clear
Clear
|
Need more help? Visit Geovision Corporate support page, Click Here...
1.0. GV650, 750, 800, 900, 1000 cards, if installed onto motherboards with VIA chipsets, will generate unstable clocking. These models use the "Hint" chip set for PCI bus control, and this Intel Hint chip set conflicts with VIA chip set. Therefore, please avoid using motherboards with VIA chipsets. Intel chipsets, SIS, and lots of other brand names are good. GV250 or GV600 do not have HINT chip sets, therefore, they are OK with VIA chip set mother boards.
DRAM is another factor that affects the performance of the card. We suggest using SDRAM, if not, then use DDR RAM or RAMBUS RAM.
We recommend any AGP video cards that supports DirectX 9.0 and above. The Intel 845G/845GL has on board VGA function that cannot support overlay display mode. If you plan to install our GV-DSP card (Real-time display card), or to use the full screen video mode (display videos from cameras only) on the Intel 845G chipset motherboard, then you can't see the image on screen. You can get around to this by installing an Direct X version 9.0 and above VGA card on the AGP slot.
As for CPU, you can use Intel, AMD, Celeron, etc.
back
1.1. Please find and delete the following files from your Hard Disk prior to installing the new hardware:
- gv*.*
- agv*.*
- oem*.inf and oem*.pnf . These files come in pairs. To make sure you delete the right ones, please open up these files with note pad to check and delete those that are for Geovision.
- geo*.*
- bt*.* (for versions 4.3 s/w)
back
1.2. This problem comes up if the installed software drivers were wrong or the motherboard not compatible.
- GeoVision uses the "BT878" chip set that is used by lots of other DVR card; or video card with capture capability. If your computer has those cards installed previously, Windows most likely would erroneously assigned the wrong driver to GeoVision. In that case, please re-install the appropriate drivers from the GeoVision CD-ROM and your problem will go away. If this does not work for you, then, follow the next step.
- GV800 drivers for version 2.0 hardware and version 5.3 should be:
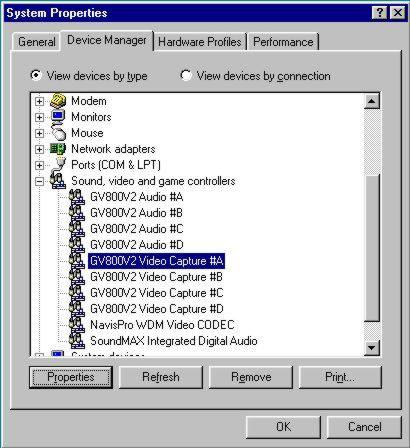
There will only be three audio and three video drivers similar to the above for GV750, two of each for GV650, one of each for GV600, GV250, GV150.When you look into the details of the audio and video drivers, you should get the attached:
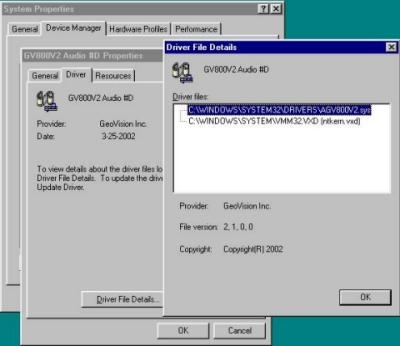
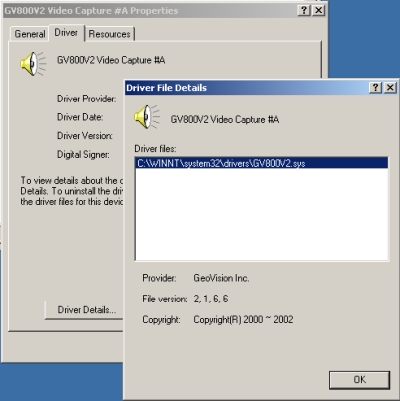
Please make sure that your audio driver is at version 2,1,0,0 or later (for version 5.4 it should be 4,1,4,1 or later) and the video version is 2,1,6,6 or later, (for version 5.3 it should be 2,1,9,4 or later, for version 5.4 it should be 2,2,2,2 or later).
If you cannot get the above drivers installed, there must be some older versions of software in your computer that you need to delete.
Following are steps to uninstall old drivers from your computer:- Delete all GeoVision application software using "un-install".
- Go to Windows Explorer, find and delete the followings: gv*.*, agv*.* , geo*.* and also oem*.inf, oem*.pnf. Be careful when you delete oem*.inf and oem*.pnf files. Open up the oem*.inf file with notepad, and see if those files are for GeoVision. Delete those and the corresponding oem*.pnf file that are for GeoVision.
- Take the GeoVision card out; turn on the computer once without the card. Double check if there are other video capturing devices in the computer, especially those that usually comes with the video card (such as ATI, Matrox...) Un-install those capture devices and software away.
- Install GeoVision and turn on the computer. If you have deleted all pertaining files, when Windows start up, it will advise you that a new hardware is found and will ASK you where to look for the driver. (***If the computer automatically assign a driver for you, be very careful: that means some old files are not erased yet, or some other BT878 related capture devices are still in the computer, and there are chances that the computer assigns the wrong driver for you. In that case, go back to steps 2 and 3 again. ***) Direct the computer to the GeoVision software CD, driver folder, and make sure you point towards the right driver, based on model no. (e.g. GV250, GV800, GV600) and hardware version.
(In most cases, if you buy from us after April 2002, the card will have version 2 label on it). Verson2 drivers are:
GV250: GV250.inf
GV600: You should have two devices for 600: one for audio using the driver with "A" on it, one for video using the driver with "V" on it. The drivers are GV600_4A.inf and GV600_4V.inf for 600 4 port card, GV600V2A.inf and GV600V2V.inf for other 600 cards.
GV650: You should have 4 devices for 650: 2 for audio using the driver with "A" on it, 2 for video using the driver with "V" on it. The 4 drivers are GV650A.inf and GV650V.inf for video.
GV750: You should have 6 devices for 750: 3 for audio using the driver with "A" on it, 3 for video using the driver with "V" on it. The 6 drivers are GV750A.inf and GV750V.inf for video.
GV800: You should have 8 devices for 800: 4 for audio using the driver with "A" on it, 4 for video using the driver with "V" on it. The 8 drivers are GV800_4A.inf and GV800_4V.inf for 800 4 port audio and video respectively, and GV800V2A.inf and GV800V2V.inf for all other 800 models.
GV900: as above, 16 device drivers, 8 for audio and 8 for video.
GV1000:as above, 32 device drivers, 16 for audio and 16 for video.
Upon complete installation, please go to device manager and you will find the audio driver version being 4,1,4,1 or later and video driver to be 2,2,2,2 or later.
- If going through the above procedure does not help you, then, your computer motherboard may not be compatible with GeoVision. Please check FAQ question 1.0 on motherboard compatibility list.
back
1.3. With the September 2002 update to Windows XP (known as Service Pack 1), Microsoft is no longer distributing any version of the Indeo codecs with its operating system. This only affects users with new PCs that are shipping with Windows XP Service Pack 1, or clean installs of Windows XP SP1 on an older system. Installation upgrades of SP1 and the use of Windows Update does not remove existing Indeo codecs from your system.
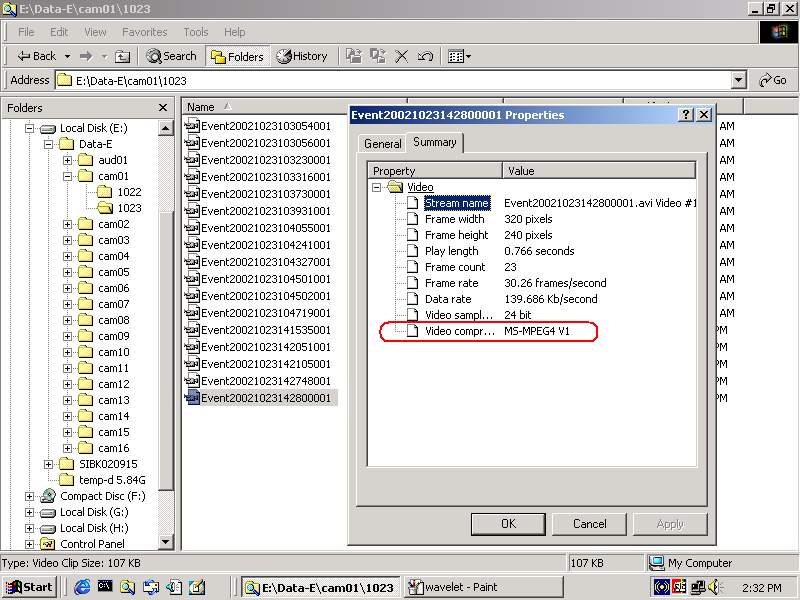
However, if you select to save as MPEG 4, it would be OK.
Wavelet (Intel Indeo) CODEC:

MPEG4 CODEC:
back
1.4. When GV-Series system is running, the system will automatically detect video source functionality and availability. If there are no video source plugged to the card, then the system will send out a beeping warning sound.
To avoid these beeping sound you may go to camera Start/Close from "Camera / Audio Install", and disable image channel for the unused channels. Please refer to the manual for more detail.
back
1.5. If there are multiple disks you've selected to record the data, once the first drive free space becomes
less than 500MB, then the recording will jump to the next one, and the next one, and so on. If the second doesn't exist,
then the program will start to recycle in FIFO(First In First Out)sequence.
back
1.7. Every time you run the GV application it'll send a code to detect the network status if one of the network server is enable. If your GV-system is not connected to the network then it will show "Send ()Em Err code=10065" message. This message is already taken away in version 5.1.
back
2.0. If you are using Internet Explorer or Netscape Navigator, make sure JavaScript and Java
capability on your browser is enabled. If you are not using either of the above listed
browsers, make sure it supports JavaScript or Java.
back
2.1. Please make sure the GeoVision camera input ports are "activated" and "show" is checked on the GeoVision software. Please make sure that the first two ports are connected with active video. Then, you can connect other ports at random. If the first port is not connected, you might not be able to view video from other ports at all. If the second port is not connected, it might take longer time to view videos from even numbered ports, i.e. ports 4,6,8,10, etc. However, once you are able to view the video on any ports, they will act "normal" from there onwards. Motion detect works immediate and fine.
Other things to check are:
- if the card is GV650 or 750 or 800, please make sure the motherboard does not have VIA chip set,
- please check your video card compatibility, as on FAQ2.2,
- please make sure your video input is strong enough. Try with a VCR or Camcorder,
- please check your camera to see if there is any need for adjustment and alignment, and that there is power to the camera,
- if you are using the new GV600 card (hardware version 2.08 or 2.08A and later), please use version 5.301 or later software.
- if your computer uses hyperthread function, please use version 5.302 or later software.
back
2.2. If you disable the "Enable full screen mode" feature in the configuration manual, your video should be OK. In order to use the full screen mode (display videos from cameras only, no hot buttons), we recommend you choice of any AGP video cards that supports DirectX 8.0 and above.
If you are using on board video chip, they cannot support overlay display mode. You can get around to this by installing an DirectX version 9.0 and above VGA card on the AGP slot.
back
3.1. GeoVision supports the following PTZ cameras:
- Canon VC-C3, VC-C4
- Pelco (Spectra series) / P or D-protocol
- Ademco (Jupiter)
- Lilin (PIH-7000, 7600, 7625)
- DiGiDome (DOH-240)
- DynaColor (D7720, D7722)
- Panasonic (WV-CS850, CS854)
- Sony (EVI-D100 D100T)
- Kalatel Dome *use KTD-312 and KTD-410 Converter as RS232 to 422 converter
- Mintron (54G2AHN/P)
- Samsung SDC-1600
- Sensormatic ultra IV
- PTZ for I/O
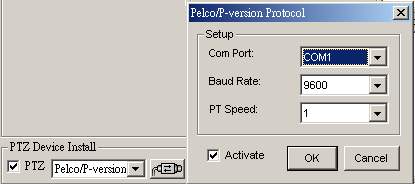
- Connect the PTZ camera
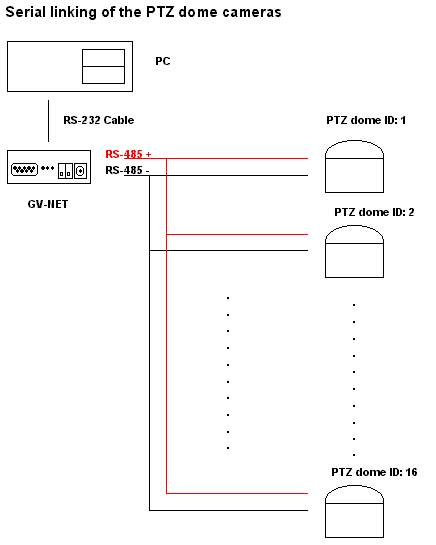
- Select PTZ dome device by using [PT Speed] drop down menu, then, click activate option. Please make sure that the baud rate and camera address is right. If you have more than one PTZ dome installed, then, each one should be activated individually.
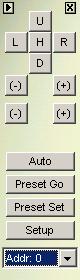
- Start PTZ control panel and use the [addr:] drop down menu to select different PTZ dome you wish to control:
back
4.1. This question is specifically asked by customers in USA. While GeoVision system
support most of the major modem manufactures (with ROCKWELL, ZyXel, Lucent
chipest), there are many other models that the customer can choose from market. Following
models have been reported also working well with GeoVison system.External Models that handles hot line alert
Use ZyXel or Luncent chip set- Smartlink modems by Archtek.com.tw (www.microbytes.com)
- ZyXel Omni 56K Modem
- Lemel MD-56K Modem
- Apollo External Fax Modem (Computer Assosiates)
- Aztech 56K External Modem
- DSI (Digicon Systems) DI3635-1 with Creative Modem
- DSI (Digicon Systems) DI5655-1 with Creative Modem
- Pine Group FM-3711 Modem
- Rockwell 6793 PCI Modem
- Triplex Spade2 Dual Mode Modem card (PCI card)
External, Modem to Modem
- Genuine Dragon-FU V1.2
- Lemel md-56k_modem
- Zyxel omni 56K
- Apollo Fax modem 56K
- Aztech 56K External modem
Internal Modems
- Lemel 56K PCI modem
- Garnet 56K PCI modem
- Triplex Spade 2 Dual Mode PCI modem
- Pragmatic PCI modem
- GVC F2000 PCI modem
- Synnex Ham 56K PCI modem
back
4.2. Use modems as recomended in answer 4.1.
back
5.0. The default ports used by GeoVision software are:- TCP server: 3550
- Multicast server (234.8.7.1 to 234.8.7.10): 3650
- Broadcast server:6009
- Active Server for GeoCenter: 20001
- HTTP for webcam: 80
- FTP for webcam: 21
- Video server for webcam: 4550
- Video output for webcam: 5550
- Audio output for webcam: 6550
- RPB server for remote playback: 5066
- NOTE: all port types are TCP.
You can re-assign any of the above ports.
5.1. Some cable and DSL service providers block out port 80 on end-users. The reason is, they charge a low monthly rate for end-users who do not host web pages (less traffic), and charge higher rates for ISP web hosting (higher traffic). To make sure end-users will not host web sites, they block port 80.
If you want to start up the web cam server with GeoVision, 80 would be the default port. The first step is to contact your DSL or cable modem supplier to see if they would open up port 80 for you. If they do not allow that, go to GeoVision webcam server and assign a different port that is NOT blocked: e.g. port 81.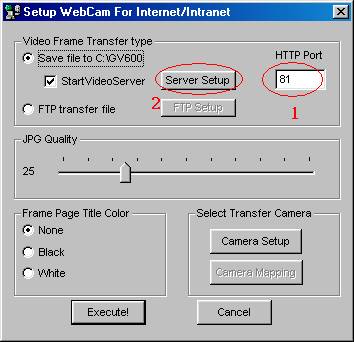
When you call from remote, key in the address of your server and append with :81 For example, if your external address is 123.456.789.001, you type onto the web browser as 123.456.789.001:81 . In this way, you can get around to the blocked port 80 problem.
There is a web site that can check your IP address and to "sniff out" all the opened ports under this IP. All you need is to start up your Geovision with the necessary network server (IP, multicast, webcast etc.) then, log onto http://myserver.org/portscan.asp . This web site will scan your IP ports and will advise which ones are opened. It will also advise you of your IP address.
back
5.2. There are three scenarios for troubleshooting:- For static IP address users: Most likely, you have full control of your router and firewall that are connected to the internet. All you need is to set up your router ports according to FAQ#12, log-on from remote with a JAVA enabled browser using your static IP address, and you will be able to see your jpeg or mpeg4 GeoVision video.
- For "fairly stable" dynamic IP address users: Most likely,you are using a cable modem or DSL. They are usually set up as if you are on a local network (your neighbors share the network). IP address changes only when routers are re-configured (typically when they add new subscribers.) This network has gateway and firewall to the Internet. Under this environment, you can call your network supplier and ask them to open up the ports as listed on FAQ#12. Moreover, you would have to be sure that you have tested your "dynamic IP address" to be correct. Then, you can try to connect from outside of your LAN using an JAVA enabled browser. If you have problems using a JAVA enabled browser to view the video, please trouble shoot following these
steps:
- Log onto the demo page from Geovision. Make sure you can see the video using JPEG and mpeg4. This verifies your browser works OK. (The Geovision demo site is on all of our Geovision web pages, their office hours are 12 hours ahead of Eastern time. So, try them in the evenings.)
- If your IP address is NOT correct, you will get the message "IP address not found". Check with your network provider the right gateway and IP address.
- If your IP is correct but your http port 80 is not opened, then, you will get a blank html page. Verify with your network provider to see if http port 80 is opened for transmission. If not, check on FAQ#5.1.
- If you can see JPEG videos but not mpeg4 videos, and that you have verified that all necessary ports are opened, please check with FAQ#5.4. You would have to install a router with the NAT.
- For users where their dynamic IP address changes every time you log on: You would have to check with your network supplier whether they would open up the appropriate ports for you as in FAQ#5.0. Then, install a router and direct all necessary ports on FAQ#5.0 towards your GeoVision server. Use the DMIP (GVIP) service as listed in FAQ#5.3 (on the GeoVision manual), or subscribe to services like "www.no-IP.com" or e-mail to sales@easytek.net where they can get around to the dynamic IP problem for you. Easytek, GeoVision and no-IP.com put a sub-routine in your computer to check you IP address. Once it gets changed, it will send the changed message to their web page. They will track the change for you. Prior to log in, you check with GeoVision on your most current address. No-IP.com and Easytek would also provide you with a domain name type of web linkage, such as Easytek.net/yourcompany'sname so that that it will route you to the desired IP address.
back
5.4. If you can view GeoVision JPEG videos across the web, but not mpeg4 videos:- Log onto the demo page from Geovision. Make sure you can see the video using JPEG and mpeg4. This verifies that your browser works OK. (The Geovision demo site is on all of our Geovision web pages, their office hours are 12 hours ahead of Eastern time, so, try it in the evenings.)
- Please set up a port for the NAT (Network Address Translation). Lets assume that you have set up:
- External IP address: 217.39.228.244 (Router or NAT IP address)
- Internal IP address: 192.168.0.20 (your PC IP address, it can be something like 10.0.0.20)
- Http port: 81 (for the NAT)
- Video server port: 4551
- Video output port: 5551

- To set up NAT address, please do the following:
- Assign port 81 on the router as in this diagram. Note: ports 80, 4550 and 5550 are assigned to local IP address 192.16.0.20 and ports 81, 4551, 5551 are assigned to 192.168.0.160.
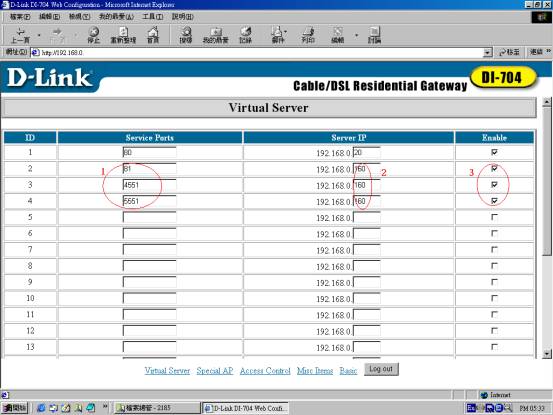
- Set Webcam http to be 81 in GeoVision
- Set Webcam Video Server port and Video Output port to be 4551 and 5551 respectively. Set NAT IP address, in this case to 217.39.228.244.
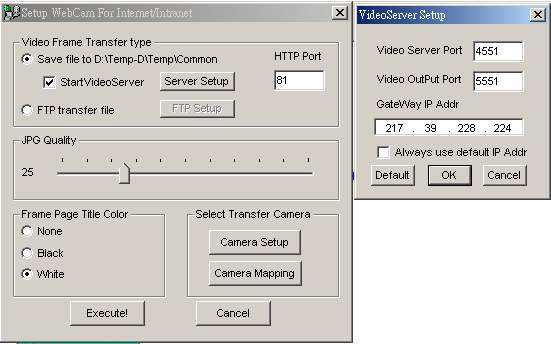
- After all setup is done, then use Web Browser (JAVA enabled) to connect, in this case, to 217.39.228.244:81.
- Assign port 81 on the router as in this diagram. Note: ports 80, 4550 and 5550 are assigned to local IP address 192.16.0.20 and ports 81, 4551, 5551 are assigned to 192.168.0.160.
back
5.6. All configuration was completed as above, but the webcam does not show up through the browser:- Please reset your router. Some router will not take new configuration till they are powered off, wait for twenty seconds, and power on again.
- Please turn off GeoVision application, and turn it on again. Enable webcam server and check your ports, IP settings. You may have to "autofind" your gateway IP address again to ensure things are OK.
- Check you browser to see if it works OK. The best way is to double check with GeoVision's demo server at www.geovision.com.tw using "1111" as Logon ID and password. Another method is to check your browser webcam plug-in. Go to Explorer, please make sure it is version 5.5 and above, select "TOOL" menu, select "INTERNET OPTIONS", select "SETTINGS" button, and select "VIEW OBJECTS". Remove "WebcamX" or "LiveX control" plug-in and close all the Windows. Restart your Internet Browser again, and start up web cam. This will force the system to reload the latest version of "LiveX(5.4.0.0)Control" plug-in.
- Smartlink modems by Archtek.com.tw (www.microbytes.com)