

iMaxCamPro (Bronze, Gold, Platinum) Network Setup
Network Setup Overview
Bronze, Gold, and Platinum iMaxCamPro DVR's
Back to iMaxCamPro Support
Table of Contents
1.) Overview
2.) Initial Setup
3.) Network Setup (DVR)
4.) Viewing through a PC
1. Overview
This guide will help you get your iMaxCamPro (Bronze, Gold, Platinum class) DVR on an existing network. First, you will be attaching your DVR to the network cable and then you will be setting up the DVR to be viewed from a PC.
2. Initial Setup
First, start with getting the DVR physically attached to your existing network. Find the network port on the back of the DVR (shown below).
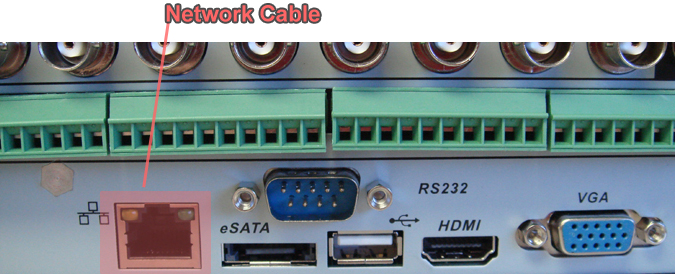
If connected properly to a routing device, you will see a green indicator light show up. This shows that we have a connection between the two devices. The yellow light will light up later to indicate data transfer.
That's all you need to do physically to setup the DVR for communication within your network. Next we will be setting up the Network options of the DVR.
3. Network Setup (DVR)
Right click your mouse and click on “Main Menu”. You will now be prompted to log in. The defaulted values for the usernames and passwords can be seen below. If none of these work, then mostly likely the passwords have been changed by someone.
Username: admin Password: admin (Administrator)
Username: user Password: user
Username: guest Passwords: guest (Lower authority user who can only monitor, playback, backup and etc.)
Note: usernames and passwords are case sensitive, so please make sure to use all lower case letters when entering in "admin"
Next, from the main menu go to “Settings” then “Network”. This location is where you will find all you will need to set the unit up network access.
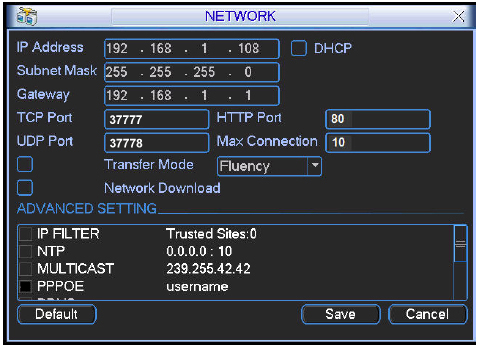
IP address: Here you can input an IP address. Be sure this IP address is unique and no other device on the network is using it.
DHCP: This function will automatically find all network address information for you and assign a unique IP address for the DVR. When you enable the DHCP function, you can not modify IP/Subnet mask /Gateway addressing. These values are from a DHCP server/router. If you do not have a server/router that has an active DHCP pool, the IP/Subnet mask/Gateway should display as 0. You need to disable the DHCP function to manually set all IP address information.
TCP port: Default value is 37777. (System server port 37778 is reserved for UDP use.)
UDP port: Default value is 37778.
HTTP port: Default value is 80.
Max connection: The system supports a maximum of 10 connections at a time. 0 means there are no possible connections allowed for the DVR.
Transfer mode: Here you can select the priority between fluency/video qualities.
LAN download: System can process the downloaded data first (prioritize) if you enable this function.
You may use the IPCONFIG & PING commands in Window’s DOS prompt to check IP information about the network you are setting the DVR up to. From your “Start” button on your desktop, click “Run” then type in “CMD” and press enter (for Vista users, the run option has been replaced with the search box found when you click the Windows “Start” button). When the command box comes up, type “ipconfig” and press enter. This will call the information you need, including an IP address (the IP address set to that computer), a subnet mask and a gateway (IP address of your router/modem). Copy the subnet mask and default gateway to enter it in to the DVR. The IP address listed is set for that computer and can not be used on another device on that network.
Next, you will find a unique address for your DVR to use. You will have to PING a random address to see if there are any other devices on that network is using it. Here is an example of the information obtained from the "ipconfig" command:
IP address: 192.168.1.*
Subnet mask 255.255.255.0
And the gateway is 192.168.1.1
* being the unique ID of that device.
Try to ping the ip address 192.168.1.199 (note: this is the defaulted IP address that comes on the unit). If the ping command times out, then no other device is using it and we can apply it to our DVR and if it does reply back, then that means another device (or the DVR that’s defaulted to that address) is using that address already. Find an address that nothing else is using and apply it to the DVR along with the subnet mask and default gateway that you found earlier.
4. Viewing through a PC
Note: Internet Explorer is the only browser compatible to view the DVR.
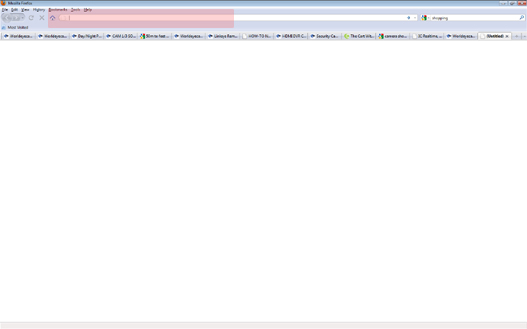
Begin with opening an Internet Explorer window and input the DVR’s IP address in the main address column. For example, if your DVR IP is 192.168.1.199, then input http://192.168.1.199. See the figure below.
Like image shown below, you will be prompted to install the Active X control/plug-in. Left click on the prompt and choose to install.

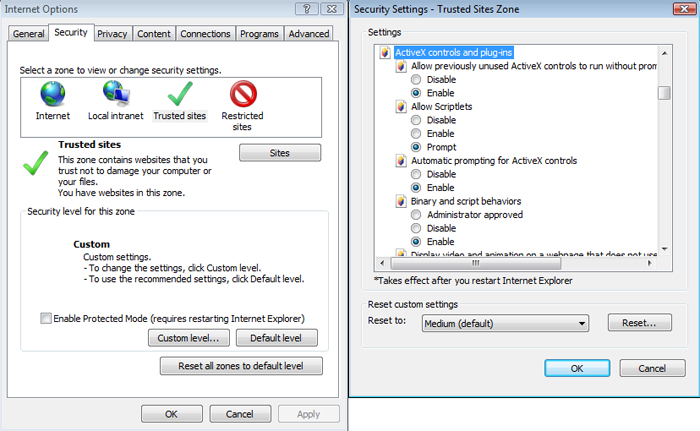
If you can’t download the ActiveX file, you will need to modify your IE settings as follows. Basically, you need to set all Active X controls to "Enable" in your security settings. To do this, click on “Tools” from the top bar of Internet Explorer and click on “Internet Options”. Click the “Security” tab at the top then choose “Custom Level” towards the bottom. Go through the list and enable all options for Active X. See the pics below for some help with this.
After that, restart Internet Explorer and type the IP address again. You will prompted to install Active X again. With the new security settings, you should now be able to install.
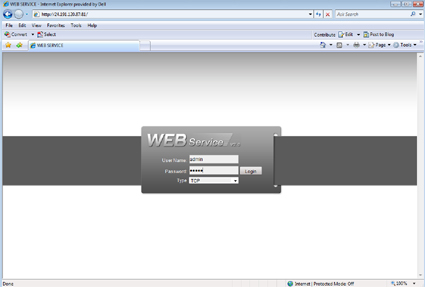
Now you should see the login screen to login to the DVR. Use "admin" and "admin" for the username and password (unless changed use that login info).
That completes the network setup. You may now login to your DVR remotely!
Bronze, Gold, and Platinum iMaxCamPro DVR's
Back to iMaxCamPro Support
Table of Contents
1.) Overview
2.) Initial Setup
3.) Network Setup (DVR)
4.) Viewing through a PC
1. Overview
This guide will help you get your iMaxCamPro (Bronze, Gold, Platinum class) DVR on an existing network. First, you will be attaching your DVR to the network cable and then you will be setting up the DVR to be viewed from a PC.
2. Initial Setup
First, start with getting the DVR physically attached to your existing network. Find the network port on the back of the DVR (shown below).
If connected properly to a routing device, you will see a green indicator light show up. This shows that we have a connection between the two devices. The yellow light will light up later to indicate data transfer.
That's all you need to do physically to setup the DVR for communication within your network. Next we will be setting up the Network options of the DVR.
3. Network Setup (DVR)
Right click your mouse and click on “Main Menu”. You will now be prompted to log in. The defaulted values for the usernames and passwords can be seen below. If none of these work, then mostly likely the passwords have been changed by someone.
Username: admin Password: admin (Administrator)
Username: user Password: user
Username: guest Passwords: guest (Lower authority user who can only monitor, playback, backup and etc.)
Note: usernames and passwords are case sensitive, so please make sure to use all lower case letters when entering in "admin"
Next, from the main menu go to “Settings” then “Network”. This location is where you will find all you will need to set the unit up network access.
IP address: Here you can input an IP address. Be sure this IP address is unique and no other device on the network is using it.
DHCP: This function will automatically find all network address information for you and assign a unique IP address for the DVR. When you enable the DHCP function, you can not modify IP/Subnet mask /Gateway addressing. These values are from a DHCP server/router. If you do not have a server/router that has an active DHCP pool, the IP/Subnet mask/Gateway should display as 0. You need to disable the DHCP function to manually set all IP address information.
TCP port: Default value is 37777. (System server port 37778 is reserved for UDP use.)
UDP port: Default value is 37778.
HTTP port: Default value is 80.
Max connection: The system supports a maximum of 10 connections at a time. 0 means there are no possible connections allowed for the DVR.
Transfer mode: Here you can select the priority between fluency/video qualities.
LAN download: System can process the downloaded data first (prioritize) if you enable this function.
You may use the IPCONFIG & PING commands in Window’s DOS prompt to check IP information about the network you are setting the DVR up to. From your “Start” button on your desktop, click “Run” then type in “CMD” and press enter (for Vista users, the run option has been replaced with the search box found when you click the Windows “Start” button). When the command box comes up, type “ipconfig” and press enter. This will call the information you need, including an IP address (the IP address set to that computer), a subnet mask and a gateway (IP address of your router/modem). Copy the subnet mask and default gateway to enter it in to the DVR. The IP address listed is set for that computer and can not be used on another device on that network.
Next, you will find a unique address for your DVR to use. You will have to PING a random address to see if there are any other devices on that network is using it. Here is an example of the information obtained from the "ipconfig" command:
IP address: 192.168.1.*
Subnet mask 255.255.255.0
And the gateway is 192.168.1.1
* being the unique ID of that device.
Try to ping the ip address 192.168.1.199 (note: this is the defaulted IP address that comes on the unit). If the ping command times out, then no other device is using it and we can apply it to our DVR and if it does reply back, then that means another device (or the DVR that’s defaulted to that address) is using that address already. Find an address that nothing else is using and apply it to the DVR along with the subnet mask and default gateway that you found earlier.
4. Viewing through a PC
Note: Internet Explorer is the only browser compatible to view the DVR.
Begin with opening an Internet Explorer window and input the DVR’s IP address in the main address column. For example, if your DVR IP is 192.168.1.199, then input http://192.168.1.199. See the figure below.
Like image shown below, you will be prompted to install the Active X control/plug-in. Left click on the prompt and choose to install.
If you can’t download the ActiveX file, you will need to modify your IE settings as follows. Basically, you need to set all Active X controls to "Enable" in your security settings. To do this, click on “Tools” from the top bar of Internet Explorer and click on “Internet Options”. Click the “Security” tab at the top then choose “Custom Level” towards the bottom. Go through the list and enable all options for Active X. See the pics below for some help with this.
After that, restart Internet Explorer and type the IP address again. You will prompted to install Active X again. With the new security settings, you should now be able to install.
Now you should see the login screen to login to the DVR. Use "admin" and "admin" for the username and password (unless changed use that login info).
That completes the network setup. You may now login to your DVR remotely!


